Walking into a newly renovated home in Singapore is an exhilarating experience. The scent of fresh paint, the gleam of new quartz countertops, and the pristine look of custom carpentry represent the culmination of months of planning and significant financial investment. However, beneath this aesthetic perfection lies a less visible reality: the “Post-Renovation Hazard Zone.”
While your contractor may have performed a basic “site clearing,” there is a fundamental difference between a space that looks tidy and one that is biologically and chemically safe for habitation. To truly protect your family and your investment, a comprehensive post renovation cleaning strategy is required to neutralize the microscopic debris that lingers long after the workers have left.
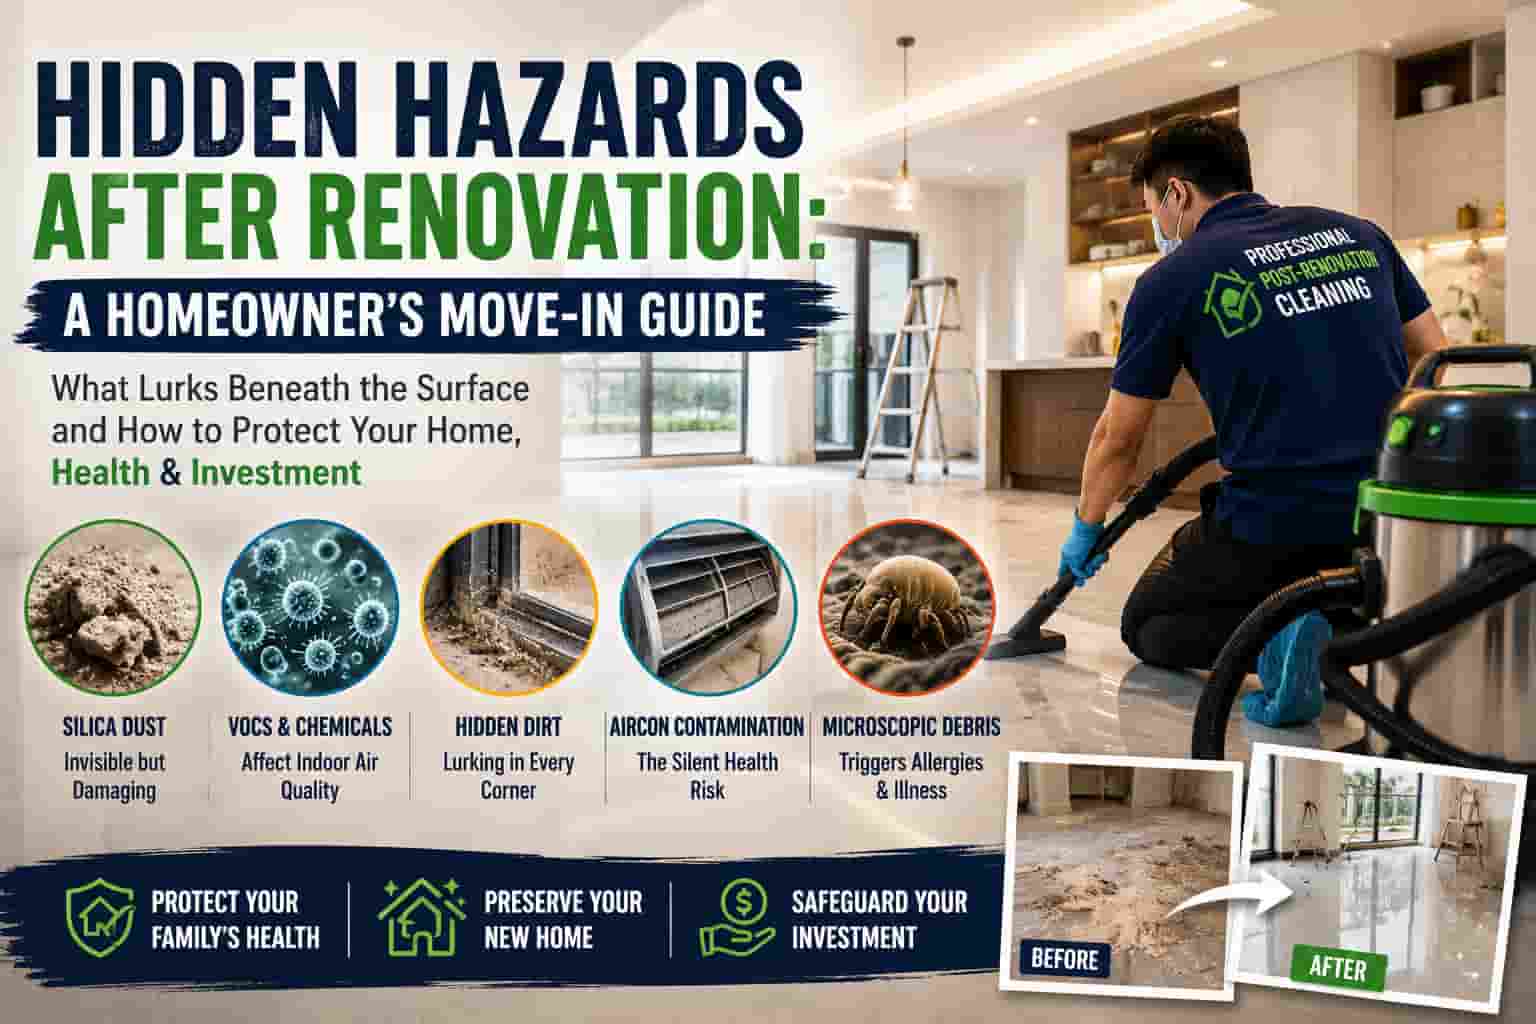
1. The Science of Silica: The Invisible Respiratory Threat
The most significant hazard in a newly renovated space is silica dust. This ultra-fine particulate is generated during the cutting of stone, tiles, and cement. Unlike common household dust, silica particles are heavy enough to settle but fine enough to penetrate deep into the lungs if disturbed and made airborne again.
Why Standard Wiping Fails
Most homeowners attempt to clean this dust using standard microfiber cloths or entry-level vacuum cleaners. The problem is that silica dust is abrasive. When you wipe it across a new surface without the proper lubrication or extraction, you are effectively “sanding” your brand-new finishes. Furthermore, standard vacuums often lack the filtration density to trap these particles, simply exhausting them back into the room through the rear vent.
The Impact on Air Quality
In Singapore’s humid climate, these particles can bond with moisture in the air, becoming “tacky” and adhering to air conditioning coils and ceiling fans. This creates a cycle where every time you turn on your cooling system, you are redistributing construction debris throughout your living areas.
2. The Volatile Organic Compound (VOC) Flush
New materials—specifically laminates, adhesives, and paints—undergo a process known as “off-gassing.” This is the release of VOCs into your indoor environment. While many modern products are “Low VOC,” the sheer volume of new materials in a full home renovation can lead to a concentrated build-up that causes headaches, throat irritation, and a “chemical” scent that persists for weeks.
Neutralizing the Scent
A proper reset involves more than just air fresheners. It requires a physical removal of the fine dust that “holds” these chemical odors. By deep-cleaning the walls and the interior of every cabinet, you remove the surface area where these chemicals cling, allowing the home to “breathe” more effectively.
3. The “Hidden” Audit: Areas Homeowners Frequently Miss
To ensure a safe transition, you must look beyond the floors and countertops. A professional-grade moving in cleaning focuses on the structural “nooks” that act as reservoirs for construction debris.
Cabinet Hinges and Drawer Tracks
Open any newly installed kitchen drawer and pull it all the way out. You will likely find a layer of sawdust or stone grit on the tracks. If left untreated, this grit acts as an abrasive, grinding down the soft-close mechanisms and shortening the lifespan of your expensive carpentry.
Window Tracks and Slider Channels
Construction dust is heavy and naturally settles into the lowest points of the room. Window tracks are notorious for trapping grit that can eventually jam the sliding mechanism or scratch the glass if caught in a cleaning cloth later.
Light Fixtures and Top Ledges
Because they are above eye level, the tops of door frames, built-in wardrobes, and light troughs are often skipped. However, these are the primary sources of “ghost dust”—the fine powder that seems to reappear on your table just hours after you’ve cleaned it.
4. Protecting Your Premium Finishes
Modern Singaporean homes often feature high-performance materials like sintered stone, engineered wood, and matte “anti-fingerprint” laminates. These materials require specific care protocols during the initial reset.
The Etching Risk: Using the wrong pH-level cleaner on new stone can cause permanent etching or “cloudiness.”
The Scratch Factor: Using a standard scrub sponge on new laminates to remove adhesive residue can leave permanent swirl marks that are only visible when the sunlight hits the surface at an angle.
A specialized house cleaning service understands the chemistry of these materials, using non-abrasive degreasers to remove “contractor grime” without compromising the integrity of the finish.
5. The Aircon Integration: Avoiding the “Dust Loop”
One of the most critical steps in a post-renovation reset is the air conditioning system. During the renovation, even if the units were covered, fine dust often finds its way into the internal filters and drainage pans.
If you begin living in the home without a professional chemical wash or deep filter clean, the AC will act as a distribution hub for construction hazards. This is often the hidden cause behind the “new house cough” that many residents experience after moving in.
6. The Transition: From Reno to Move-Out
While the focus here is on moving in, it is worth noting that many homeowners are managing two properties simultaneously. If you are vacating a rental to move into your newly renovated home, you are likely also coordinating a move out cleaning service for your previous landlord.
The logistical pressure of managing two high-stakes cleanings can be overwhelming. However, the standards for each are very different. While a move-out clean is about “restoration” to meet a contract, a post-renovation reset is about “sanitization” to protect your health.
7. A Homeowner’s DIY Checklist for the First 48 Hours
If you are managing the initial phase yourself, follow these high-impact steps:
Vacuum Before You Wipe: Always use a HEPA-certified vacuum to remove the bulk of the dust before introducing water. Adding water to construction dust creates a “slurry” that is much harder to remove.
Top-Down Approach: Start with the ceiling fans and the tops of cabinets. Allow the dust to settle, then vacuum the floors last.
Flush the Air: Keep all windows open and fans on high for at least 48 hours to assist with VOC off-gassing.
Check the Grout: Ensure there is no residual grout film on your tiles; once this hardens, it requires acidic cleaners that can damage the tile surface.
Starting Your New Chapter Safely
A renovation is a major milestone, but the process isn’t truly complete until the “hidden hazards” are neutralized. By prioritizing a deep, technical reset of your environment, you aren’t just cleaning—you are ensuring that your new home is a safe, healthy, and pristine sanctuary for years to come.
Frequently Asked Questions About Post-Renovation Hazards
1. Can I just use my regular household vacuum to clean up construction dust?
It is highly discouraged. Most standard household vacuums lack a certified HEPA filtration system dense enough to trap microscopic silica dust. When you use a regular vacuum, the fine powder passes straight through the filter and gets blasted back out through the exhaust vent into your indoor air. Furthermore, abrasive construction grit can quickly scratch the internal components and ruin the motor of a standard machine.
2. How long should I wait after renovation before scheduling a deep clean?
You should wait at least 24 to 48 hours after all carpentry installation and painting are completely finished. This short buffer gives the fine, airborne dust a chance to finally settle out of the air onto your floors and flat surfaces. If you clean too early while the air is still thick with suspended particles, a fresh layer of “ghost dust” will simply blanket your home again the very next day.
3. What happens if construction dust gets into my air conditioning system?
If your cooling units are turned on while fine drywall or stone dust is still present, the system will pull those abrasive particles directly into the internal coils and drainage pans. Over time, this dust mixes with the aircon’s natural condensation to form a thick, pasty sludge. This sludge clogs the drainage pipes (leading to aircon leaks) and acts as a breeding ground for hidden bacteria and mold, forcing your system to work harder and driving up your utility bills.
4. How can I tell the difference between standard dust and dangerous silica dust?
Standard household dust is mostly soft, organic material like skin cells and fabric lint. Construction dust, particularly from hacking tiles or cutting stone, feels incredibly fine, powdery, and noticeably gritty or chalky between your fingers. Unlike household dust, it doesn’t easily clump together and has a tendency to leave a stubborn, cloudy white film on shiny surfaces even after you have wiped it down multiple times.
5. Why is a professional post-renovation clean better than a standard wipe-down?
A standard wipe-down often just pushes the ultra-fine grit across your brand-new surfaces, which can cause microscopic scratches on delicate finishes like matte laminates or glossy quartz. Professional teams use a systematic, top-down extraction method. They combine industrial-grade HEPA vacuums, high-temperature steam, and specialized microfiber techniques to physically lift and remove the particles from your home rather than just shifting them around.
Related Articles to Read
- Why Construction Dust Keeps Returning After Renovation (And How To Fix It)
- Cleaning Checklist Before Moving Into A New Home
- 5 Reasons To Hire A Professional Cleaning Service For Post Renovation Cleaning
- How Hidden Ceiling And Aircon Dust Spikes Your SP Bill
- Post Tenancy Cleaning Checklist: Pass Your Singapore Inspection
- House Cleaning Standards In Singapore: What To Expect In 2026